Introduction
If you have ever written an MFC application, you may have missed console window. A console window is such convenient. Like me, you may believe that printf is the most excellent function for debugging. (I hate cout though. Don't use IOSTREAM and STL! They mess everything up!). You can terminate a not-responding program simply by pressing CTRL+C key on a console window without opening Task Manager. However, by default, an MFC application doesn't have a console window. But, adding a short source code (30 lines) to your project and changing a link option will add a console window to your MFC application.
Please follow the instruction below to add a printf-able console window to your MFC application.
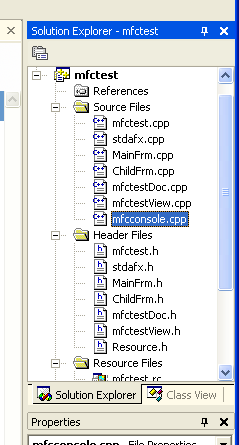
(1) Download mfcconsole.cpp (click by right button and choose "save"). Or, you can cut & paste following code and save it as "mfcconsole.cpp". Then, in Visual Studio .NET, choose "Project" menu -> "Add Existing Item", and select mfcconsole.cpp to insert the file to the project.
#include "stdafx.h"

#include <stdio.h>
#include <windows.h>

extern "C"
{
int PASCAL WinMain(HINSTANCE inst,HINSTANCE dumb,LPSTR param,int show);
};


int main(int ac,char *av[])
{
    char buf[256];
    int i;
    HINSTANCE inst;

    inst=(HINSTANCE)GetModuleHandle(NULL);

    buf[0]=0;
    for(i=1; i<ac; i++)
    {
        strcat(buf,av[i]);
        strcat(buf," ");
    }

    return WinMain(inst,NULL,buf,SW_SHOWNORMAL);
}
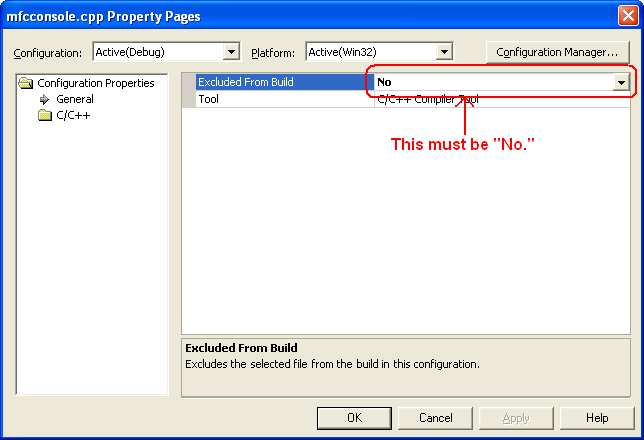
Sometimes, Visual Studio apparently exclude the included file from build for unknown reasons. To check if the file is excluded from build, click "mfcconsole.cpp" in "Solution Explorer" window, and choose "Property."
Then, make sure "Exclude from Build" is set to "No." If not, select "No" from the drop list.
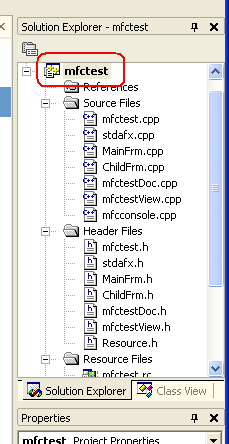
(2) In "Solution Explorer" window, choose the project name by mouse left button. (In this example, mfctest is the project name.)
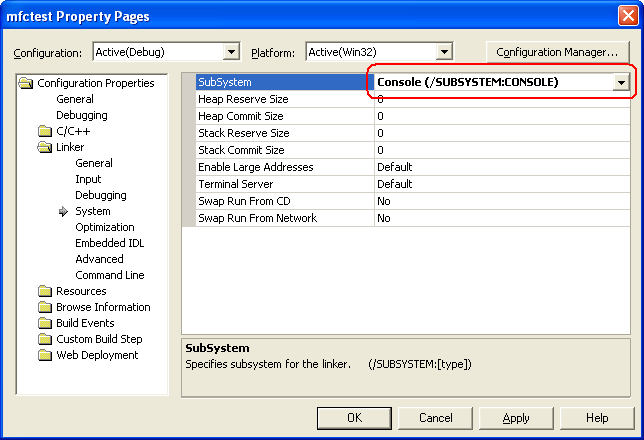
(3) Choose "Project" menu -> "Property", and choose "Linker" -> "System" in the property dialog. Then, set "SubSystem" to "Console (/SUBSYSTEM:CONSOLE)". (Choose from the drop list.)
This is it. Now you can compile and run the program to see your MFC application with a console window.
When you need to remove the console window, you can simply set this "SubSystem" back to "Windows (/SUBSYSTEM:WINDOWS)."
Here's how to add a printf-able console window to your MFC application.
(1) Download mfcconsole.cpp (click by right button and choose "save"). Or, you can cut & paste following code and save it as "mfcconsole.cpp". Then, choose "Project"->"Add to Project"->"Files", and add this program to your project.
#include "stdafx.h"

#include <stdio.h>
#include <windows.h>

extern "C"
{
int PASCAL WinMain(HINSTANCE inst,HINSTANCE dumb,LPSTR param,int show);
};


int main(int ac,char *av[])
{
    char buf[256];
    int i;
    HINSTANCE inst;

    inst=(HINSTANCE)GetModuleHandle(NULL);

    buf[0]=0;
    for(i=1; i<ac; i++)
    {
        strcat(buf,av[i]);
        strcat(buf," ");
    }

    return WinMain(inst,NULL,buf,SW_SHOWNORMAL);
}
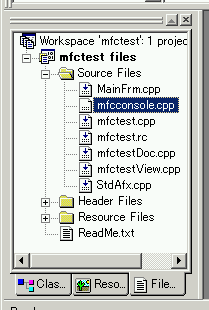
Sometimes the file added to the project is for some reason excluded from build. If the icon of mfcconsole.cpp on file view window does not have a downward arrow as shown below, the file is excluded from build, and must be included. (If you see a downward arrow like other files, you can skip the following step and go to (2))
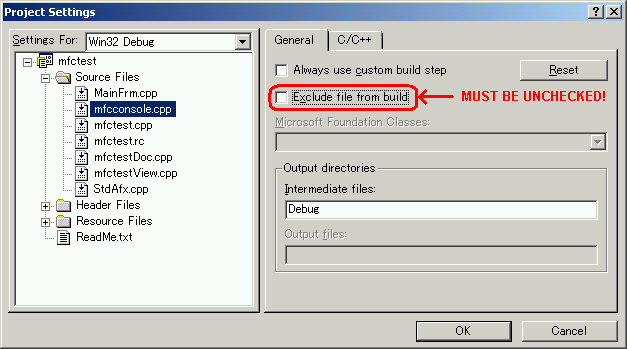
To include the file in build, click mfcconsole.cpp in the file view window by the mouse right button, and choose "Setting." Then, go to "General" tab and UNCHECK "Exclude file from build."
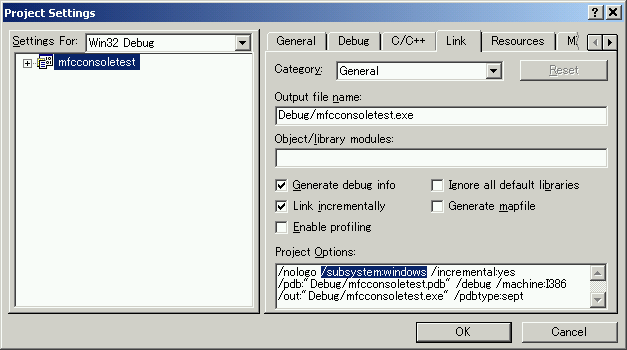
(2) Choose "Project"->"Setting", then open "Link" tab.
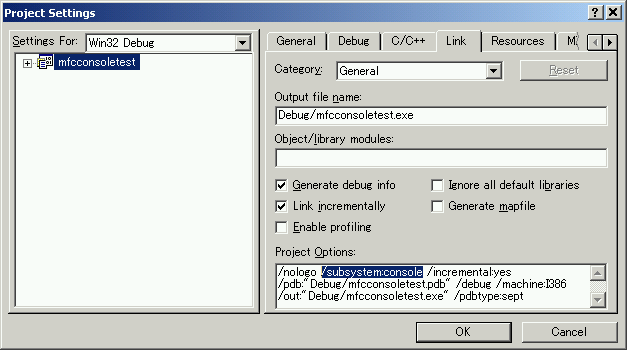
(3) Go to "Project Options" textbox, and find "/subsystem:windows" (If you don't see this option, scroll the textbox until you see it.), and change it to "/subsystem:console"
This is it. Now re-build your project, and you will see a console window popping up when you launch the program.
When you want to hide your console window, simply change "/subsystem:console" back to "/subsystem:windows" You don't even have to delete mfcconsole.cpp from your project.
The link option "/subsystem:*****" is the option that controls whether the program has a console window. If "/subsystem:console" is given, the program will have a console window, and the program starts from "main" function. If "/subsystem:windows" is given, the program will not have a console window, and the program starts from "WinMain" function, although "WinMain" is hidden for an MFC application.
Hence, if you simply change this option to "/subsystem:console" in an MFC application project, you will get an error message telling that the linker cannot find "main" function. Because an MFC application is supposed to be a console-less program, there is no "main" function, and the program is supposed to start from "WinMain" function.
"mfcconsole.cpp" provides "main" function and solves this error. The "main" function in "mfcconsole.cpp" simply calls "WinMain" function and starts an MFC program.
When you change the link option back to "/subsystem:windows", "main" function in "mfcconsole.cpp" will be simply ignored, and the console window will not be shown.
